How To Update Your Ski Utah Listing
Ski Utah Member Listing Updates
The information found below will help you to correctly update your member listing on SkiUtah.com. Some input options may not be available to you, depending on the type of listing that you have elected to use this season. For example, only Premium listings have the ability to add Deals. If you are interested in adding an option that you do not currently have, or think that an option you should have is not active, please contact Connor Shanklin at Connor@skiutah.com.
You can view the difference between the listing options
FOUR EXAMPLES
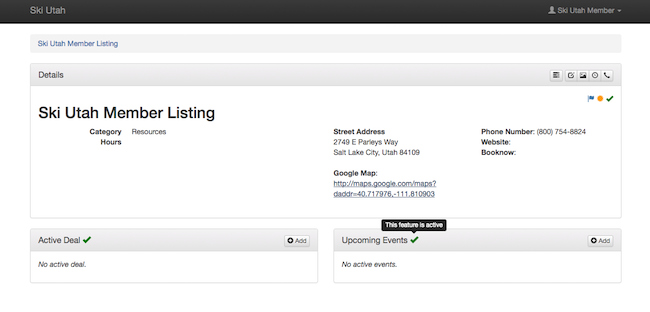
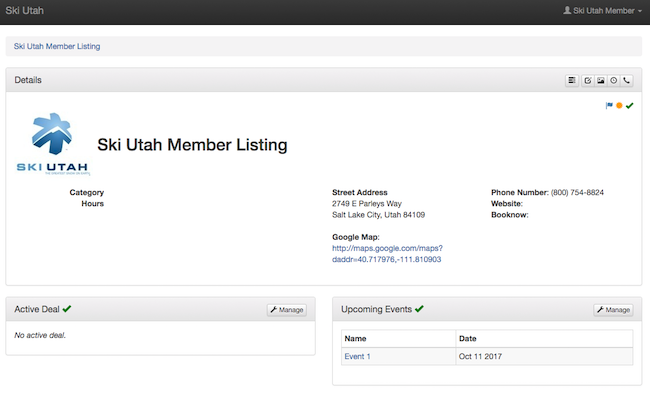
There are two basic sections of your Member Listing. The "Results" section and the "Listing" section.
The "Results" section is a shortened version that shows up on the Ski Utah Trip Planner and directory style listings for each category like the Lodging Listings Section. It is important to have the most up to date information available on your results page section and listing. This increases quality and click through rates to your website.
The "Listing" section provides more information about your business to users. It includes a larger body text section, location, and contact information. It can also include various imagery pieces, book now buttons, social media links, deals and more depending on the upgrade options you have elected to purchase.
Please use the Table of Contents below to see all of the update options. You can click each option to jump to a detailed explanation of how to update each portion of your listing. Please email the membership manager at membership@skiutah.com with any questions.
- Access Your Listing
- Service Copy
- Listing Images
- Service Hours
- Contact Info
- Deals
- Events
- Listing Reporting
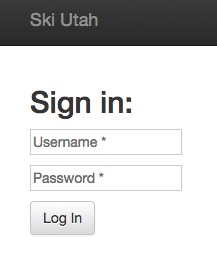
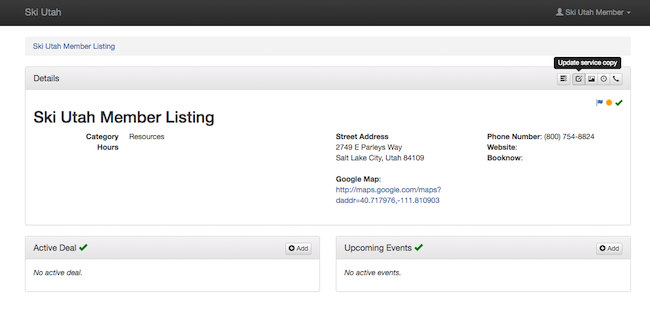
Access Your Listing
Login
At the bottom of any SkiUtah.com page, you will find a series of options, including "Members". In this list, select the Login option. Use the Username and Password you've been supplied. If you don't know your login credentials, please contact the membership manager at membership@skiutah.com.
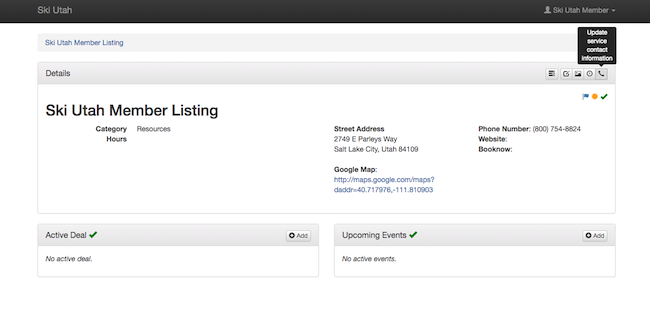
Select Your Listing
Once logged in, you will find a selection of listings that you have the access to update. Select the listing you would like to manage. If you do not have access to a listing that you would like to update, please contact the membership manager at membership@skiutah.com. Next to each listing, you will see a series of symbols. A Blue Flag indicates that a listing is "Featured". A Yellow Sun indicates that a listing is "Upgraded", a Green Check indicates that a listing is "Active", and a Red X indicates a listing is "Inactive".

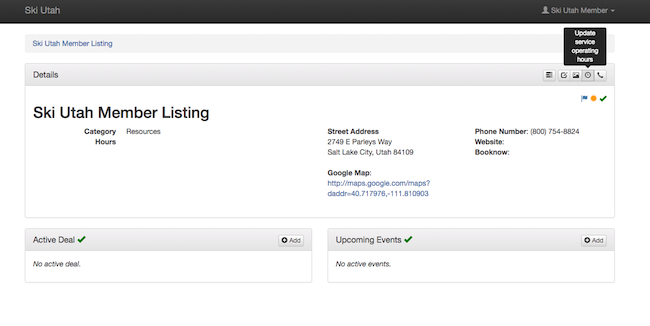
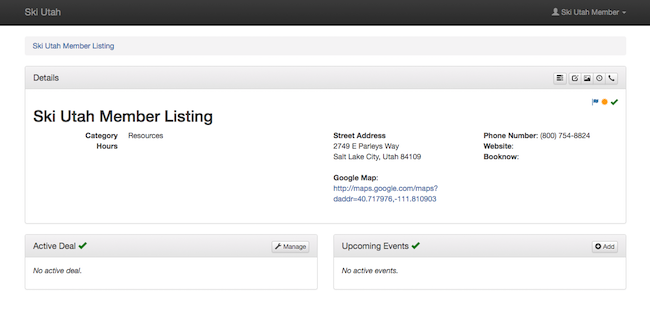
Once you select a listing, you will be taken to that listing's main page. This page will display most of the information loaded into the listing, and provides navigation to the various update options at your disposal.
Service Copy
The "Service Copy" is the text you provide to show up on results pages and on your listing provide users with information about your business. It should be interesting, informative and succinct.
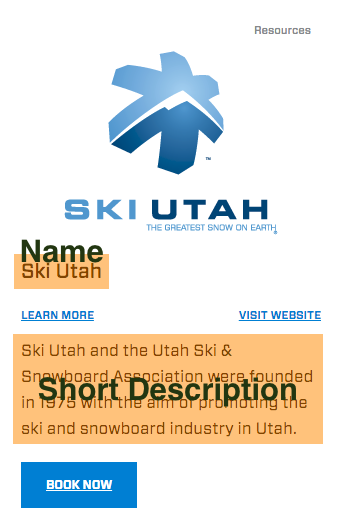
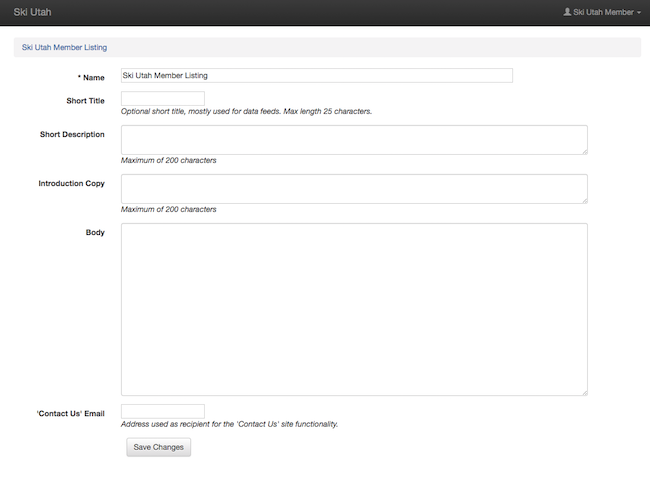
Name
This is the "Name" of your listing, as it will show up on Results pages, and at the top of your listing. For example, if you would like the name of your Hotel listing to include it's location, and not just its brand, you would update this field.
Short Title
This field is used for data feeds, such as a Ski Utah API, and does not need to be updated by you. There is currently nothing using this field.
Short Description
This is the text that will show up as a results in the Trip Planner and the directory pages. This text should tell a user about your business, and should entice the user to view your website or click to learn more about your company by clicking to view your listing. This field allows a maximum of 200-characters, including spaces.
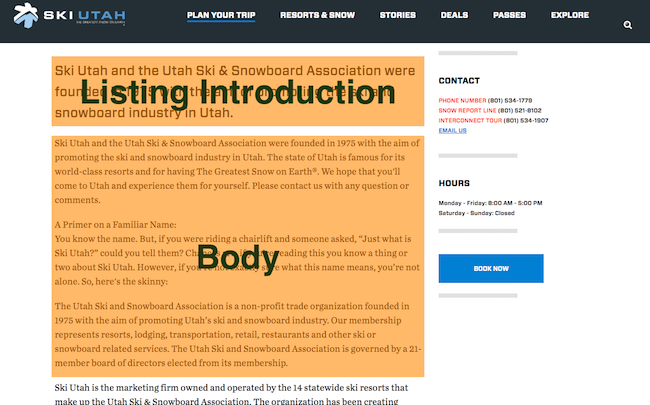
Listing Introduction
This field will update the larger text on your listing. This should serve as an introduction to the text that you include as the body of your listing. This field allows a maximum of 200-characters, including spaces.
Body
This field will update the smaller text in the body of your listing. It also accepts any valid HTML text. For example, if you would like to include multiple paragraphs, you will need to use <p> tags to open and close paragraphs.
'Contact Us' Email
This updates the email address that will receive "Send Email" requests from the top section of your listing. This should ideally be a general contact email, and should be an email that is checked frequently.
To update:
To update service copy options, from the Main Page of a listing, click the "Update service copy" button from the top right of the listing's main page.
This link will take you to a page that will allow you to update each of the copy sections of your listing. Please review the explanations of each of the copy types below.
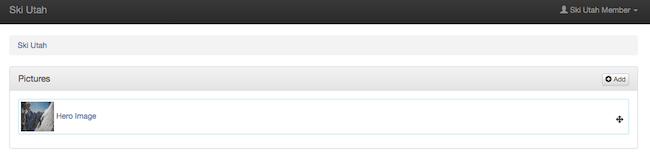
Listing Images
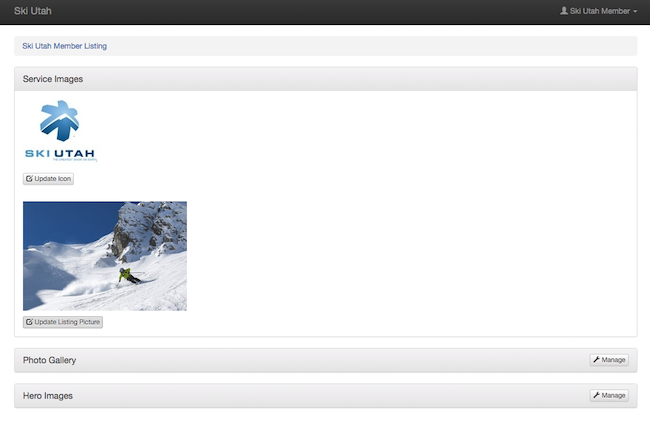
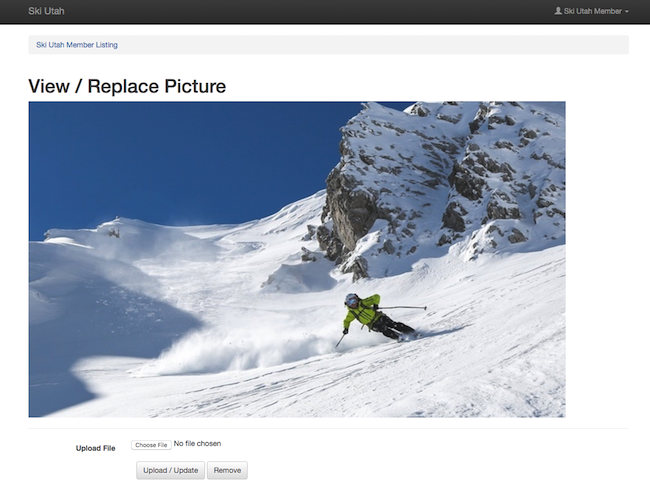
Next to the copy of your listing, having effective imagery can make the most impact on the click through rate of your listing. It is critical that you load images to the correct size — otherwise, the images will be stretched or crunched to fit the format of the pages. To update your listing images, select the "Update service pictures" button from the top right of the listing's main page.

This will bring you to a page that will show you each of the images that has been loaded.
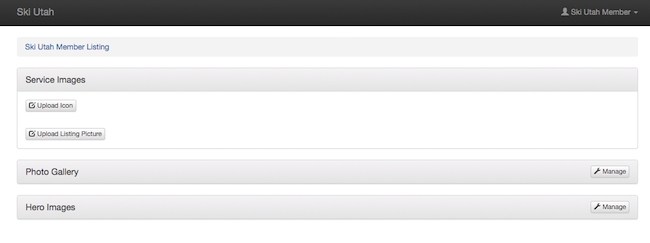
If no images are displayed, then no images have been loaded in, and a default Ski Utah Logo image is being used in it's place.
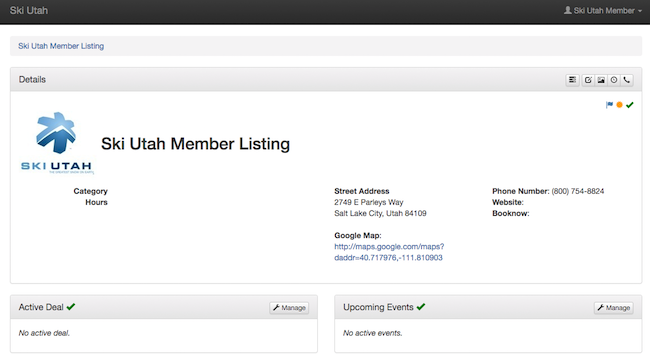
Upload/Update Logo
This is the image that shows up on the right side of your listing. It should be the most up to date logo for your business.
![]()
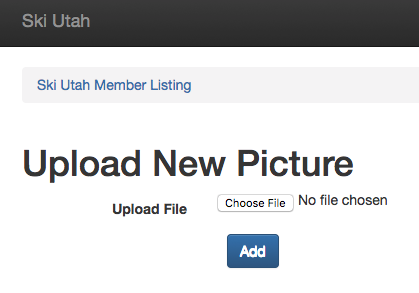
- Upload a New Logo
To load a logo image for the first time, click the "Upload Icon" button. You will then be taken to an upload page. Your logo MUST be a 224x200 pixel, JPG or PNG file.
- Update an Existing Logo
If you already have a logo loaded, and would like to change it, navigate to the "Update Service Pictures" page from the listing's main page. Then, click the "Update Icon" button.

On the following page, below the preview image, you can upload a new file. Load the new image, and click "Upload/Update". If you wish to simply remove the image, you can do so, and follow the steps above for uploading a new logo. Please note, your logo MUST be a 224x200 pixel, JPG or PNG file.

Upload/Update Results Image
This is the image that shows up on results pages on SkiUtah.com. It should be the best, most enticing image of your business.

- Upload a New Results Image
To load a results image for the first time, click the "Upload Icon" button. You will then be taken to an upload page. Your results image MUST be a 300x200 pixel, JPG or PNG file.
- Update an Existing Results Image
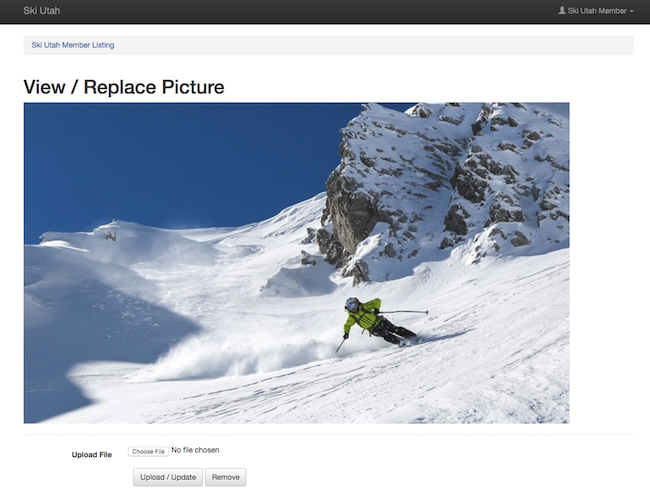
If you already have a Results Image loaded, and would like to change it, navigate to the "Update Service Pictures" page from the listing's main page. Then, click the "Update Listing Picture" button.
On the following page, below the preview image, you can upload a new file. Load the new image, and click "Upload/Update". If you wish to simply remove the image, you can do so, and follow the steps above for uploading a new results image. Please note, your results image MUST be a 300x200 pixel, JPG or PNG file.
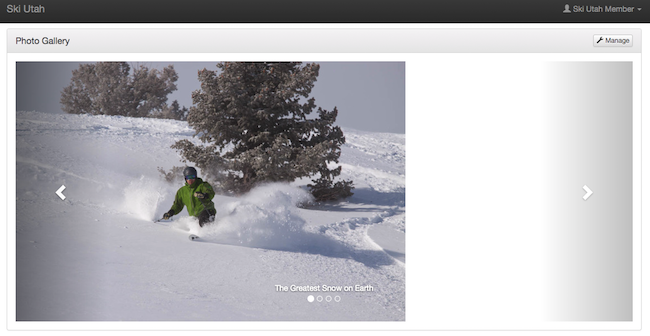
Upload/Update Photo Gallery Images
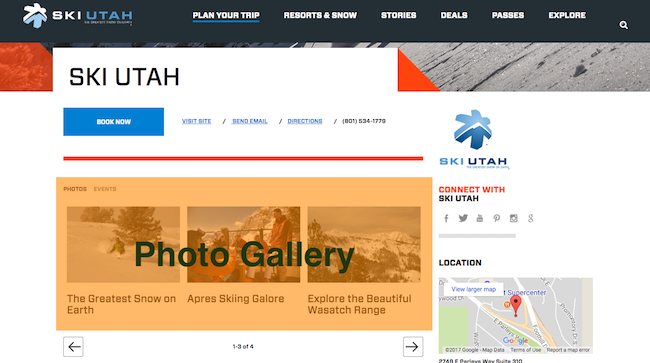
If you've purchased a listing upgrade that includes Photo Gallery images, you will have the ability to upload and update the images that can be viewed on your listing. To update Gallery images, click the "Manage" button in the Photo Gallery block.
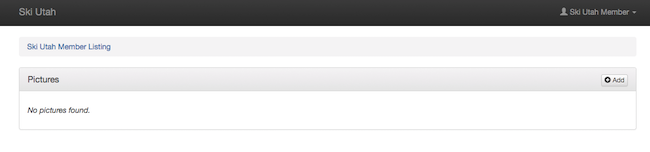
- Upload a New Gallery Image
To upload a new gallery image, click the "Add" button in the top right of the block. This will take you to an upload page. Your gallery image MUST be a 1020x600 pixel, JPG or PNG file. We recommend naming each file with the caption you would like the picture to have. Otherwise you will need to manually change the captions (instructions below).
- Update/Remove an Existing Gallery Image
If you already have gallery images loaded, and would like to change one, navigate to the "Update Service Pictures" page from the listing's main page. At the top right of the Photo Gallery section, you will find a "Manage" button. Click this button.
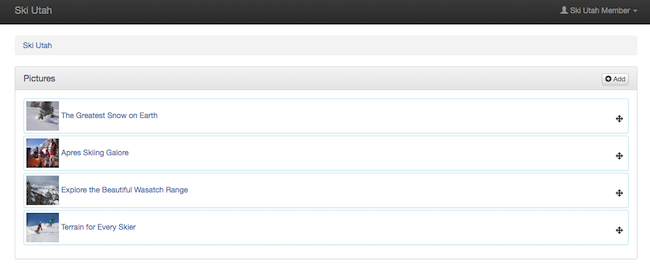
On the following page, you will see all of the gallery images that have already been loaded.
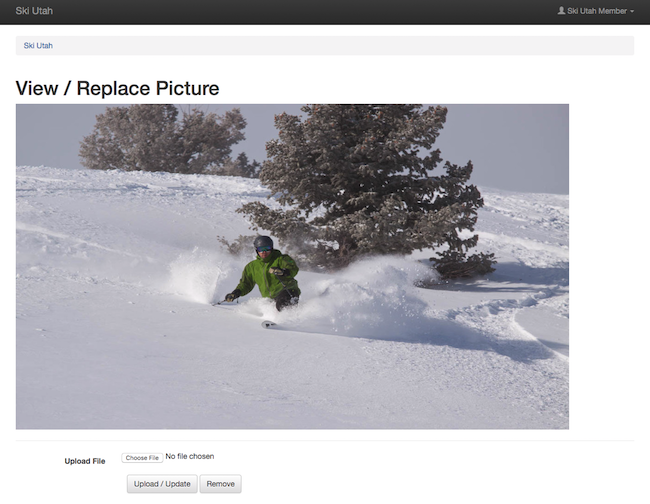
Locate the image you would like to update, and click the image (not the caption text). On the next page, load the new image, and click "Upload/Update". If you wish to simply remove the image, you can do so by clicking the "Remove" button. Please note, your gallery image MUST be a 1020x600 pixel, JPG or PNG file.
- Change an Existing Gallery Image's Title
If you already have gallery images loaded, and would like to change the caption of one, navigate to the "Update Service Pictures" page from the listing's main page. At the top right of the Photo Gallery section, you will find a "Manage" button. Click this button.
On the following page, you will see all of the gallery images that have already been loaded.
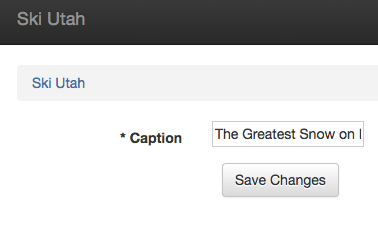
Locate the image you would like to update, and click the caption text (not the image). On the next page, you can edit the caption text. If you would like your images to have no captions at all, please contact membership at membership@skiutah.com.
- Change the Order of Photo Gallery Images
If you would just like to change the order of the images, you can do so by clicking and dragging with the "navigation icon" at the right of each image. Your listing will show the top three images in the gallery preview, so these should provide the strongest representation of your business.
Upload/Update Hero Image
If you've purchased a listing upgrade that includes a Hero image, you will have the ability to upload and update the image that displays at the top of your listing. To update the Hero Image, click the "Manage" button in the Hero Images block.
- Upload a New Hero Image
To upload a new Hero Image, click the "Add" button in the top right of the block. This will take you to an upload page. Your hero image MUST be a 1600x650 pixel, JPG or PNG file.
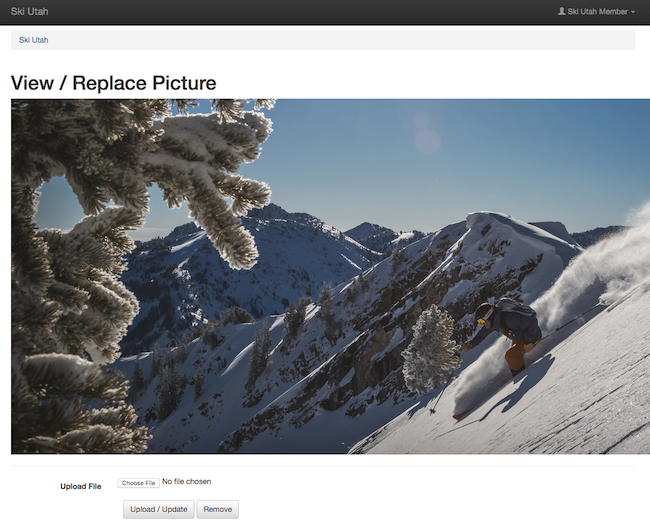
- Update an Existing Hero Image
If you already have a hero loaded, and would like to change it, navigate to the "Update Service Pictures" page from the listing's main page. At the top right of the Hero Images section, you will find a "Manage" button. Click this button.
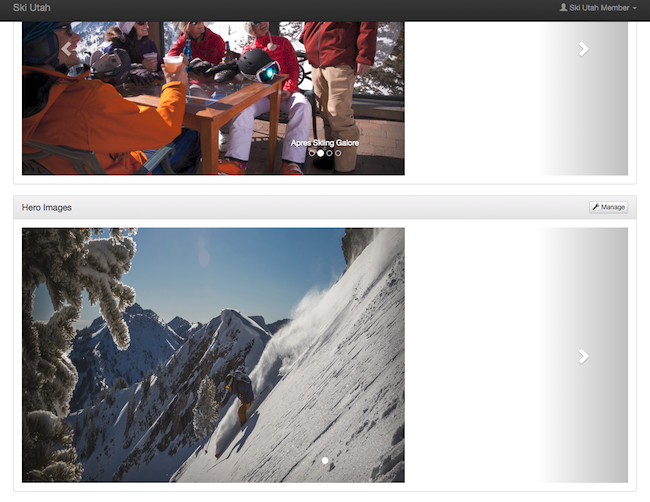
On the following page, you will see all of the hero images that have already been loaded. Only the top image will display. If you have multiple images loaded, you can use the navigation icons at the right of each image to drag and drop your preferred image at the top.
Locate the image you would like to update, and click the image (not the caption text). On the next page, load the new image, and click "Upload/Update". If you wish to simply remove the image, you can do so by clicking the "Remove" button. Please note, your hero image MUST be a 1600x650 pixel, JPG or PNG file.
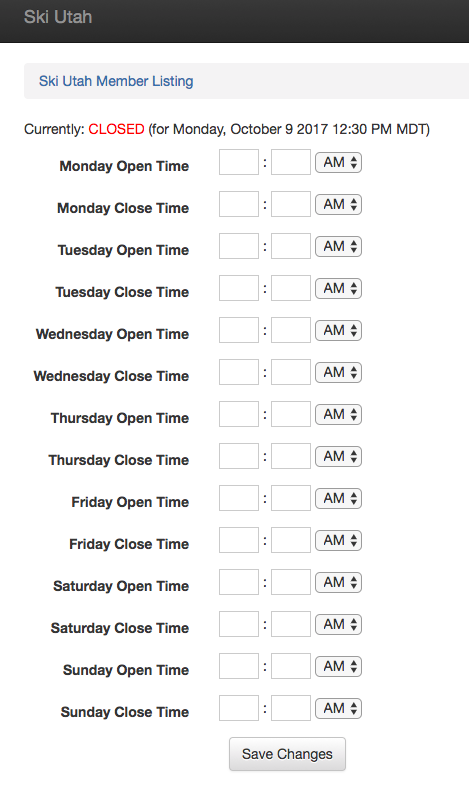
Service Hours
Adding service hours to your listing can be a great way to indicate to users either the hours that your phone lines are staffed, or your hours of operation if you are an activity or other business that has closing hours. To update your service hours, select the "Update service hours" button from the top right of the listing's main page.
On the next page, you can input the opening and closing hours for each day of operation. We will dynamically create a service hours breakdown based upon the days that have the same hours of operation.
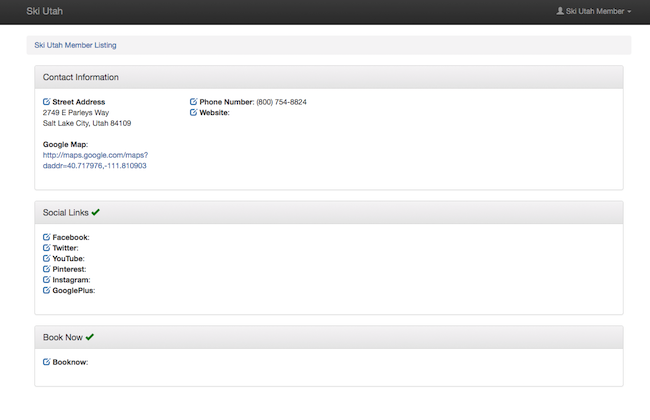
Contact Info
The Contact Information for your listing is the most important section to keep up to date. It is the place that all of the various modes of contact can be managed, including website, phone number, address and more.
Contact Types
- Update Website URL
At the top of the Service Contact page is the "Contact Information" section. In this, you will find a "Website" field. This is the URL for the "Visit Website" link on your listing. This is on all listings, and on the results page for upgraded listing. We encourage the use of tracking links such as UTM tags to help with attribution. To update, click the blue "Pen" icon.
- Update Book Now Button URL
At the bottom of the Service Contact Info page is the "Book Now" section. If you have elected to upgrade to a listing that includes this, you will see a green check mark next to the Book Now title. In this, you can update the URL of the "Book Now" link on your listing and results pages. We encourage the use of tracking links such as UTM tags to help with attribution. To update, click the blue "Pen" icon.
- Update Address
At the top of the Service Contact page is the "Contact Information" section. In this, you will find a "Street Address" field. This is the address that will show up in the Location section of your listing. To update, click the blue "Pen" icon.
- Update Phone Number
At the top of the Service Contact page is the "Contact Information" section. In this, you will find a "Phone Number" field. This is the phone number that will show up at the top of your listing. To update, click the blue "Pen" icon.
- Update Social Network URLs
At the middle of the Service Contact page is the "Social Links" section. If you have elected to upgrade to a listing that includes this, you will see a green check mark next to the Social Links title. In this, you will find fields to update the URL for the six supported social media channels. To update, click the blue "Pen" icon next to each channel, and load the URL of your page.
- Check Listing Geo-Location
At the top of the Service Contact page is the "Contact Information" section. In this, you will see a "Google Map" field. This URL will lead you to a new google.com/maps page, showing the current Latitude and Longitude input for the location of your listing. This location is used to calculate your business' proximity to the resorts, so it is critical that your location is accurate. If you feel that it is inaccurate, please contact the membership manager at membership@skiutah.com.
To update:
To update your contact information, select the "Update service contact information" button from the top right of the listing's main page.
This will take you to a main page that shows all of the various update options at your disposal. To update any item on this page, click one of the light blue "pen" icons to the left of a data title. If you do not have access to update a contact mode, you either may not have a listing upgrade that includes that contact piece, or it may not be turned on. Please contact the membership manager at membership@skiutah.com with any questions.
Deals
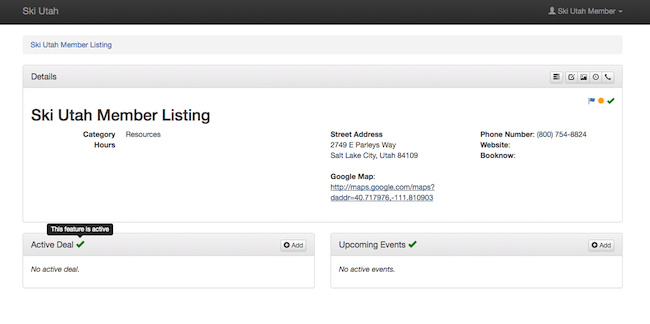
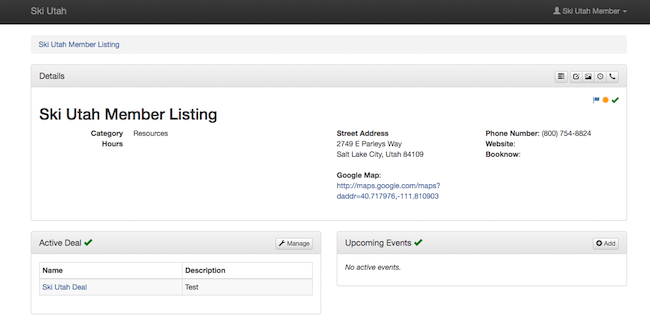
If you have elected to upgrade your listing to include the ability to place a deal on the Ski Utah Deals page, you will find a green check mark in the "Active Deal" section at the bottom left of listing's main page.
Upload Your First Deal
If you have never uploaded a deal, you will find an "Add" button at the top right of the "Active Deal" section at the bottom left of the listing's main page. Click the "Add" button. This will take you to a page containing all of the information needed to activate a deal.
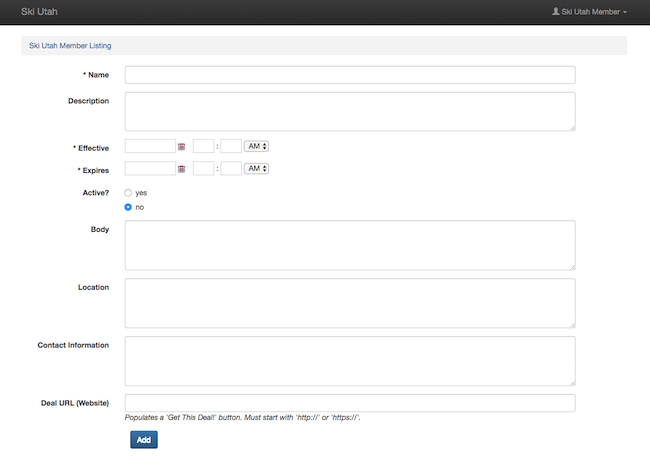
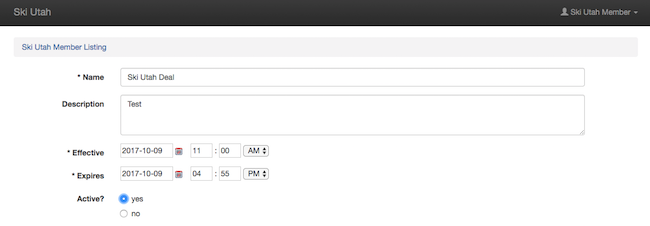
The deal requires a Name, Effective Date and Expiration Date, however we strongly recommend filling in all of the information — especially the Description (which shows up on the Deal results page) and Deal URL, with a tracking URL if you would like. The "Effective" date will trigger your deal to begin displaying on our website, and the "Expiration" date will remove the deal from our page. These dates do not need to be the same as the valid dates for your offer. It is simply the dates that you would like to publicize your deal to our audience. If you would like to include the dates that your deal is valid, the "Body" field is a good place to do so. Do not set your deal as active, as you have not loaded an image yet. Once you hit Add, you will be directed back to your main user page. Navigate back to the listing to which you just uploaded a deal, and click the newly updated "Manage" button at the right of the "Active Deals" section.
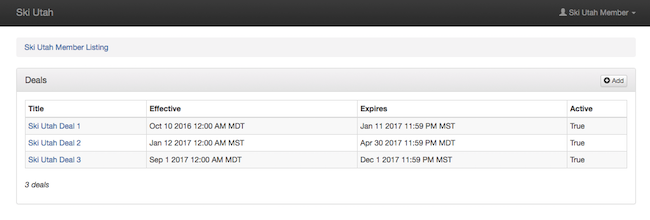
This will bring you to the Deal Management page. On this page, you will find the deal that you just uploaded.
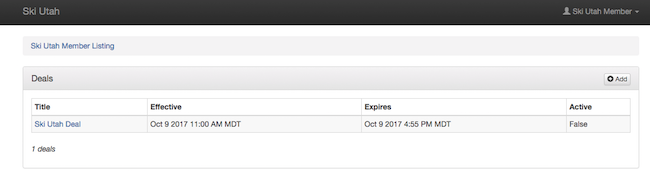
Notice that the "Active" field says "False." This means that the deal will not show up on the SkiUtah.com/Deals page, even if the current date is between the "Effective" and "Expires" dates. Click the "Title" of the deal that you just uploaded. This will bring you to Update Info page for that deal.
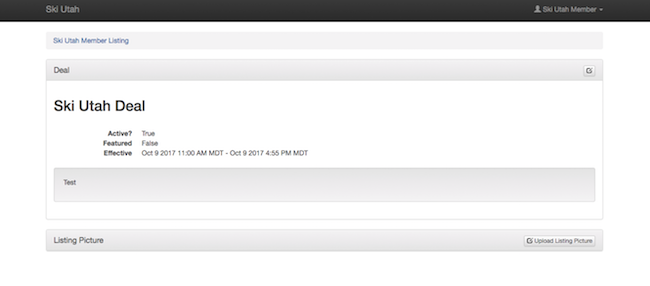
To add a Results Image for your deal, select the "Upload Listing Picture" option at the bottom right of the page. To load a results image for the first time, click the "Upload Listing Picture" button. You will then be taken to an upload page. Your deal image MUST be a 700x467 pixel, JPG or PNG file. Once you submit your image, you will be redirected to the Update Info page for the deal. It will now show your uploaded image at 300x200 pixels. This is how the image will be displayed on the SkiUtah.com/Deals page. If it looks skewed, please be sure that you've uploaded a correctly sized image. If you are still having trouble, contact the membership manager at membership@skiutah.com.
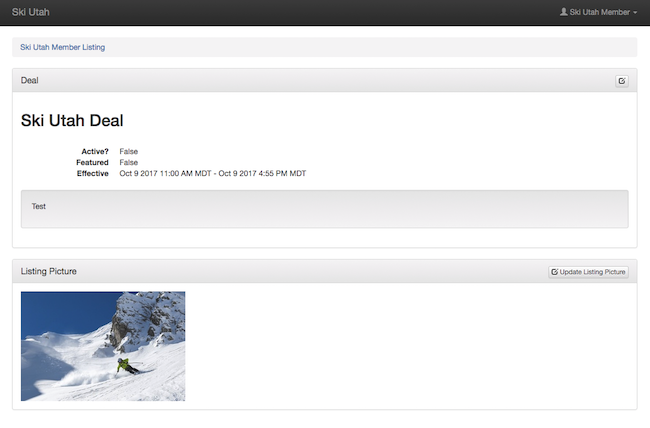
Finally, click the "pen" icon at the top right of the Deal box. You can now set the deal "Active".
If your deal is set to be effective today, then it should show up at the bottom left on your listing's main page. If you have any questions about whether your deal was correctly added, you can check the Ski Utah Deals page or contact the membership manager at membership@skiutah.com.
Upload a New Deal
If you have a new offer that you would like to promote, we recommend adding a new deal, rather than updating a deal you have already set up. This way you can view the performance of each individual deal, rather than combining traffic under one deal. If you have already uploaded a Deal in the past, you will find a "Manage" button at the right of the "Active Deals" section of the listing's main page. Click this button.
You will click through to a page showing all of the deals that you have loaded in the past.
To add a new deal, click the "Add" button at the top right of the Deals box, and follow the steps above to load a new deal. Click here to jump up to read about how to load a deal.
Update a Deal
If you have a new offer that you would like to promote, we recommend adding a new deal, rather than updating a deal you have already set up, if you would just like to update an active deal, you can do this. To do so, click the "Manage" button at the right of the "Active Deals" section of the listing's main page.
You will click through to a page showing all of the deals that you have loaded in the past.
Click the "Title" of the deal that you would like to update. This will take you to the Update Info page for the deal.
Select the "Pen" icon in the top right to update the deal's copy, effective/expiration date, URL, and more.
If you would like to update the deal's image, click the "Update Listing Picture" button at the top right of the Listing Picture block of the Update Info page. Click this button. On the next page, you will be able to either update or remove the image. Your deal image MUST be a 700x467 pixel, JPG or PNG file. Once you submit your image, you will be redirected to the Update Info page for the deal. It will now show your uploaded image at 300x200 pixels. This is how the image will be displayed on the SkiUtah.com/Deals page. If it looks skewed, please be sure that you've uploaded a correctly sized image. If you are still having trouble, contact the membership manager at membership@skiutah.com.
Manage Active Deal Dates
You can change the active dates of a deal, if you are cutting an offer short, or extending it. Additionally, as you are limited to one active deal per listing at a time, if you upload a deal with dates that overlap another active deal, you will get an error. To fix this, you will need to adjust the "Effective" and "Expiration" dates of your active deals. You can view these on the Deal Management page:
Follow the steps above to update your deals to change the active dates or remove any overlaps.
Events
If you have elected to upgrade your listing to include the ability to place events on the Ski Utah Events page, you will find a green check mark in the "Upcoming Events" section at the bottom right of listing's main page.
Upload Your First Event
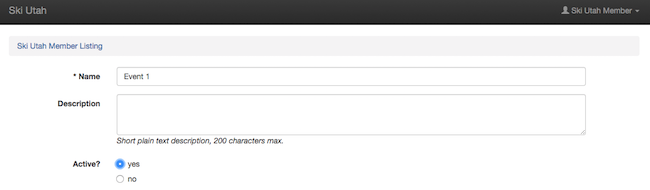
If you have never uploaded an event, you will find an "Add" button at the top right of the "Upcoming Events" section at the bottom left of the listing's main page. Click the "Add" button. This will take you to a page containing all of the information needed to activate an event.
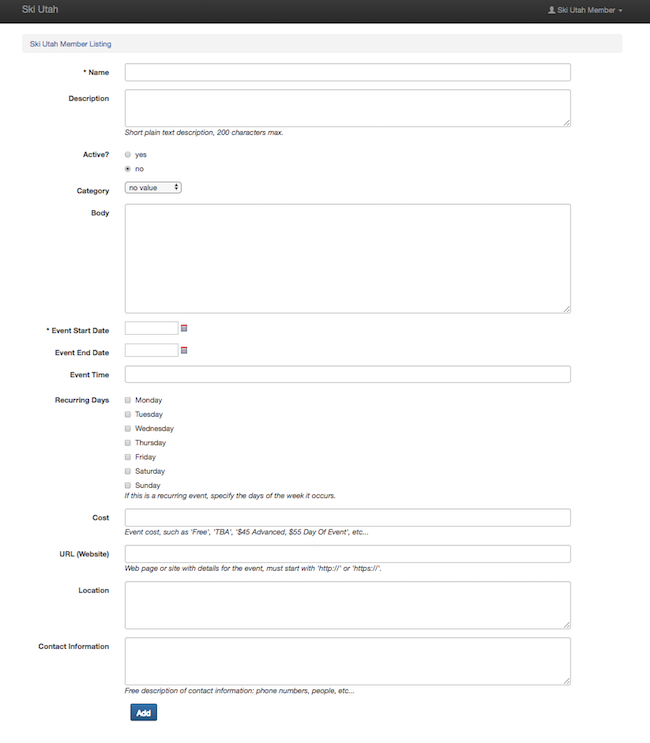
The event requires a Name and Start Date, however we strongly recommend filling in all of the information — especially the Description (which shows up on the Event results page) and Event URL, with a tracking URL if you would like. The "Event Start Date" will trigger your event to begin displaying on our website, and the "Event End Date" will remove the event from our page. These dates should be the dates that your event is being hosted. As long as these dates are in the future, your event will display. Do not set your event as active, as you have not loaded an image yet. If your event is reoccuring, you can set the start date as the date of the first reoccuring event, the end date as the date of the last reoccuring event, and select the "Reoccuring Days" that the event will be hosted. Our events page will automatically duplicate your event for each reoccuring date it is being hosted. Once you hit Add, you will be directed back to your main user page. Navigate back to the listing to which you just uploaded an event, and click the newly updated "Manage" button at the right of the "Upcoming Events" section.
This will bring you to the Event Management page. On this page, you will find the event that you just uploaded.
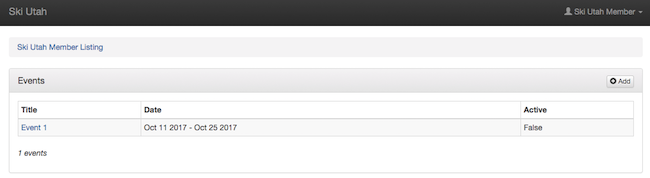
Notice that the "Active" field says "False." This means that the event will not show up on the SkiUtah.com/Events page, even if the current date is between the "Start" and "End" dates. Click the "Title" of the event that you just uploaded. This will bring you to Update Info page for that event.
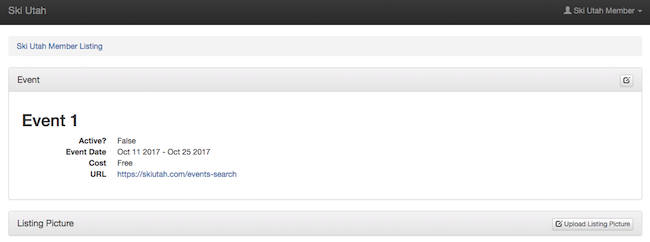
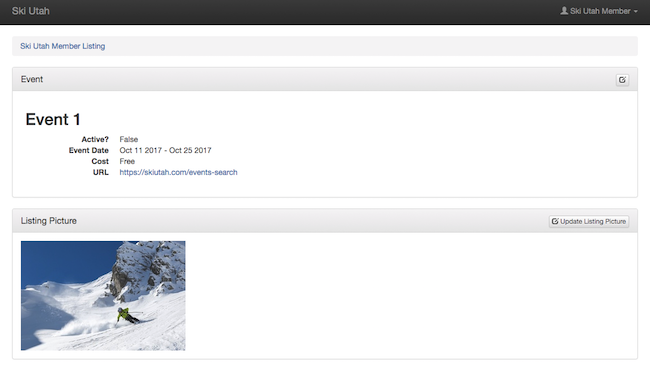
To add a Results Image for your event, select the "Upload Listing Picture" option at the bottom right of the page. To load a results image for the first time, click the "Upload Listing Picture" button. You will then be taken to an upload page. Your event image MUST be a 700x467 pixel, JPG or PNG file. Once you submit your image, you will be redirected to the Update Info page for the event. It will now show your uploaded image at 300x200 pixels. This is how the image will be displayed on the SkiUtah.com/Eventss page. If it looks skewed, please be sure that you've uploaded a correctly sized image. If you are still having trouble, contact the membership manager at membership@skiutah.com.
Finally, click the "pen" icon at the top right of the Deal box. You can now set the deal "Active".
If your deal is set to be effective today, then it should show up at the bottom left on your listing's main page. If you have any questions about whether your deal was correctly added, you can check the Ski Utah Deals page or contact the membership manager at membership@skiutah.com.
Upload a New Event
If you have a new event that you would like to promote, we recommend adding a new event, rather than updating an expired event you have already set up. This way you can view the performance of each individual event, rather than combining traffic under one. If you have already uploaded an Event in the past, you will find a "Manage" button at the right of the "Upcoming Events" section of the listing's main page. Click this button.
You will click through to a page showing all of the deals that you have loaded in the past.
To add a new deal, click the "Add" button at the top right of the Deals box, and follow the steps above to load a new event. Click here to jump up to read about how to load a deal.
Update an Event
You can change the active dates of an event, adjust the image, copy and more, if you are cutting it short, extending it, or want to refresh the information. You can view this from the Deal Management page:
Click the "Title" of the event that you just uploaded. This will bring you to Update Info page for that event. From this page, click the "pen" icon in the top right of the event box. This will bring you to the Event Update page. On this page you can adjust all of the copy, start/end dates, and more. If you would like to change the picture, click the "Update Listing Picture" button on the Update Info page for that event. You can either replace or remove the image. If you remove the image, follow the steps above for loading a first event image.
Listing Reporting
Filtering the Data
Text
Interpreting the Data
Text